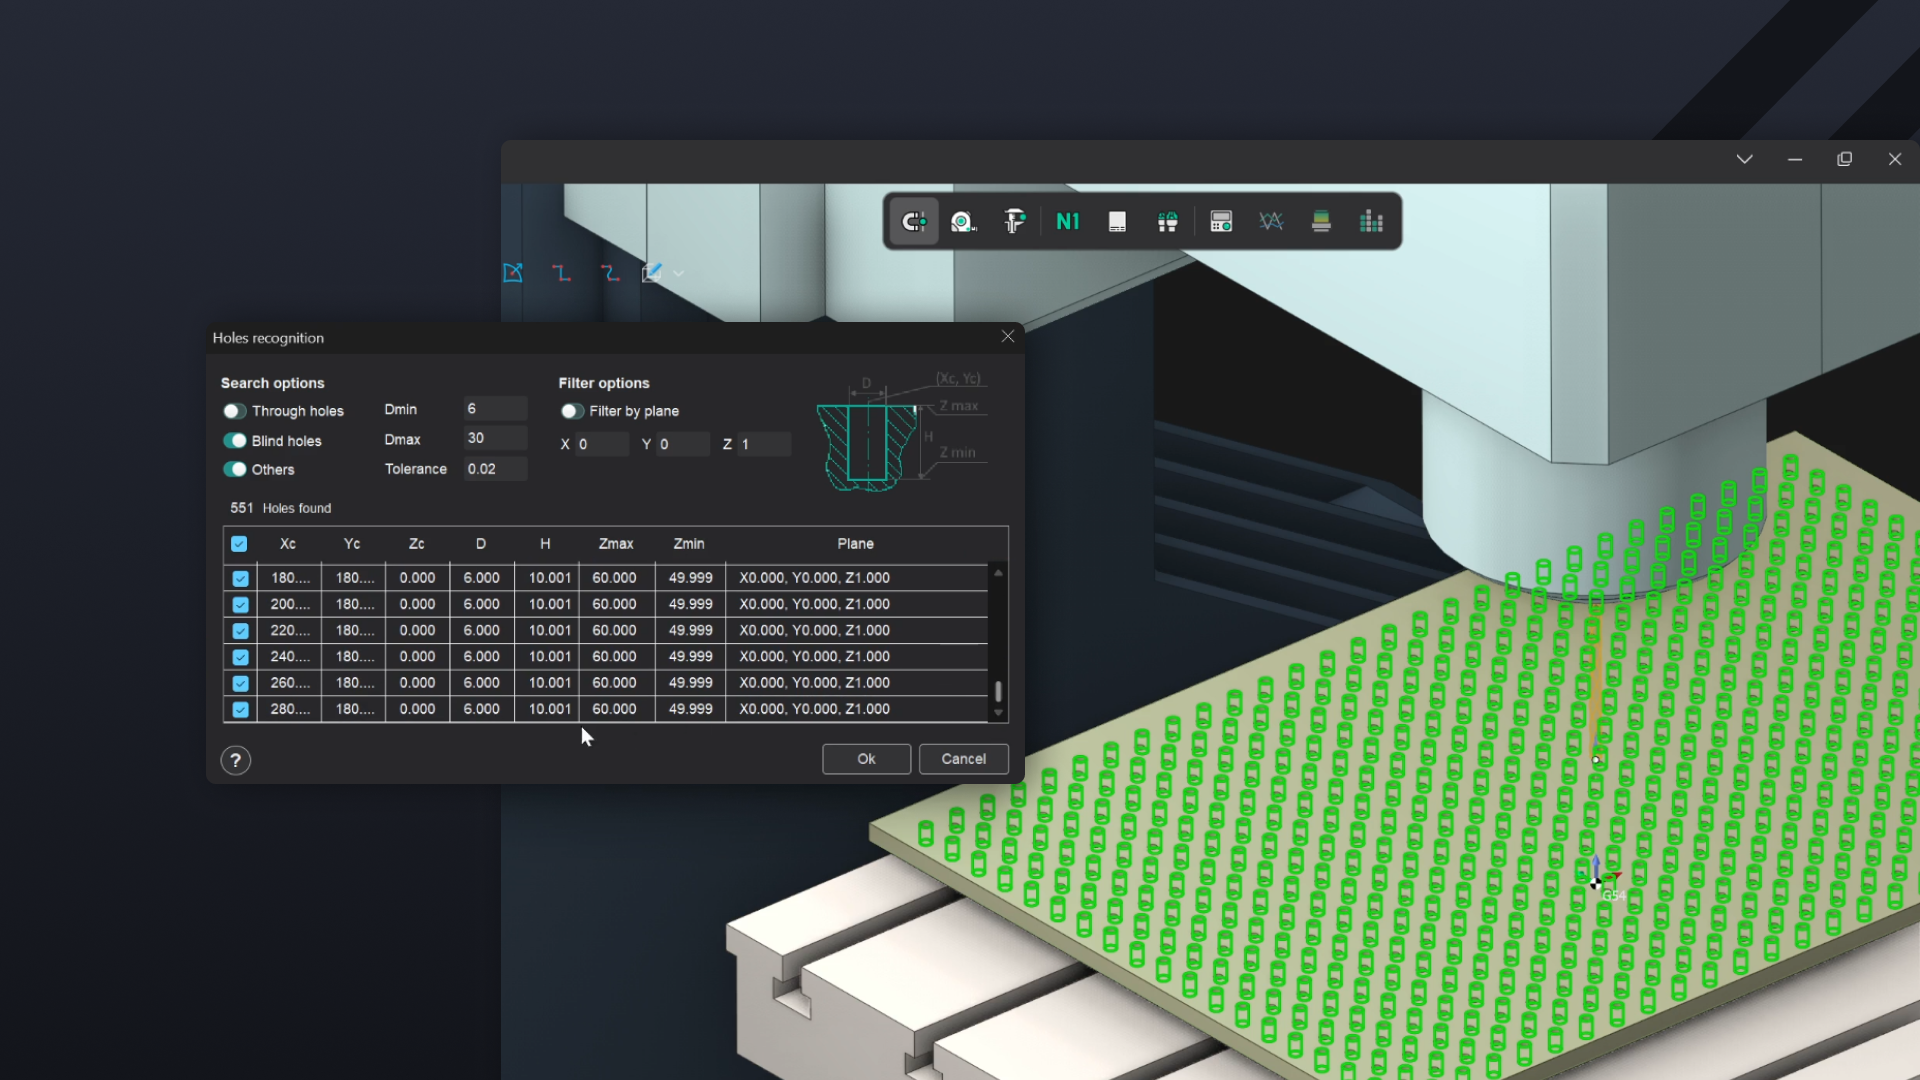
Automatic Hole Recognition, Drilling and Tapping cycles is part of ENCY Milling – Hole Machining. Sign in with your ENCY account to access lessons, assignments and progress tracking.
Sign inRead the full text version — the video itself requires sign-in.
Hi there. So for this video we're going to be taking a look at the drilling functionality in ENCY with a special focus on the auto recognition tools that are built in. So to start with I'm going to import a part. I'm not interested in setting up a full and comprehensive milling process for this part.
This is purely demonstrative for drilling. So I'm going to go to the model space and I'm going to import the fixture plate part that I've got here. This is a very very standard looking fixture plate. It's got plain drilled holes and it'll have tapped holes as well.
So as I say since this is not going to be a full setup I'm just going to float it above the tool bed because it doesn't need to be properly anchored. This is purely illustrative. So to start with we are going to take a closer look at this anyway and we can see we have an array of different holes here. So one is going to be 6mm which is this hole as we see here D6 and these ones are 5mm so D5.
Now the 5mm holes are going to be threaded and the 6mm holes are going to be plain drilled. So to do this we'll go to add operation and under the holes option we've got hole machining and first things first I don't like the fact that we've got this ridiculously oversized conical mill here. So I'm going to change that to something a bit more relevant. Let's have a quick scroll through and we'll grab a 6mm drill and select the tool for operation and the next thing that we're going to do is we're going to take a look at the hole recognition system.
So we're going to go to job assignment and we're going to click on recognize and it'll also populate this window to start with and typically what it will do is it will do this based on the size of the tool that's currently mounted in the holder. So in this instance it's going for a minimum diameter of 6mm and a maximum diameter of 30mm. The fact is we only want 6mm to be selected but fortunately because the other holes are smaller than that it's not really a problem for us in this instance. So if we have a very quick scroll through we can see these different informational points here so we've got our coordinates, we've got our diameter we've got our heights along with the Z plane heights in there as well and if we scroll through we can see that every single hole there is 6mm in diameter which is exactly what we're after.
So I'm going to click on OK for this and you can see we've now auto populated this list for everything that's 6mm which is very much within our needs. Now the next thing that we're going to do is we're going to define the terms of the actual drilling operation itself. So under strategy we've got drilling type here. Now I would like ideally to be able to remove the chips whilst we're cutting this so the flutes of the drill don't get clogged up.
So if we go with chip removal you'll see that it gives us the option to define dwells as well as the step down as well. So this is going to be a PEX style operation and because it's a 6mm drill bit in a 10mm plate that means we'll have two PEX which will be enough to be able to clear out the chips and to be able to cut all the way through cleanly. So I'm going to leave that as is because that all works for me that's very much within the realms of what we're after and I'm going to generate the toolpath based on this. So as we can see here with the red lines we've got the toolpath as much as we'd expect with the final lift-off points at the end there.
I'm going to simulate it just for the sake of sanity checking. So I've turned off the machine in the simulation at the moment because otherwise you get a lot of confusing moving around whereas now we just want to see the drill moving around for this bit. So let's run. If we slow it down we can see there's two PEX in there as we expect there to be and it's going to traverse across the range of holes that fit the drill bit in question.
So this rather neatly ties up the first half of the operation. So the next thing I'm going to do is because I would like to tap the other holes I'm going to go with an undersized drill to start with and then we're going to do a tapping operation as well. So first things first we go back to holes we go back to hole machining again and we are going to change the tool again to a four millimeter drill because it's a five millimeter hole is going to be five millimeters through an M5 threaded hole. So for now we want to do a clearance drill so select the tool for the operation and we are going to go to the job assignments and we're going to click on recognize again.
Now obviously the problem that we have here is because this is predicated off the size of the tool it's going to be four millimeters as the minimum diameter and because it automatically assigns a range it means it's going to encompass the six millimeter holes as well. So we need to wait for this to finish also calculating everything and then we want to define the beam axis five and we give it a second to think about it again so once it's finished also calculating that we'll then scroll through here and just make sure that everything's five millimeters in the diameter column which it is and we'll click on OK.